
10 Jan How to Pour Concrete for Strong Foundations?
Concrete pouring is key to making strong foundations. A good concrete pouring job ensures that structures last and remain stable, whether for patios or larger buildings. Using the right methods during concrete pouring helps prevent cracks or shifts, which can occur due to poor preparation or incorrect mixing. For example, achieving the right mix of water and cement is crucial for strength; too much water can weaken the mixture. Following essential steps like packing the base and setting forms properly contributes to the durability of the concrete. Learning to execute concrete pouring effectively makes projects strong and long-lasting.
Getting the Site Ready for Concrete Pouring
Before pouring concrete, I always prepare the site carefully. This step is important for a strong foundation, whether for a patio or driveway. Skipping it can cause cracks, uneven surfaces, or even failure later. Let’s break it into three simple steps.
Cleaning and Leveling the Ground
First, I remove debris, plants, and obstacles from the area. Rocks, roots, or old materials can weaken the concrete. For example, when building the Grand Coulee Dam, workers cleared loose materials for a solid base. I follow this rule, even for small projects.
After clearing, I level the ground. Uneven ground can make concrete settle badly. I use shovels and rakes to smooth the surface. Then, I compact the soil with a tamper or compactor. This stops the ground from moving under the concrete. A compacted base keeps the foundation strong for years.
Adding a Subbase
Next, I add gravel or crushed stone as a subbase. This layer makes the foundation stable and helps water drain. Without it, water can collect and cause cracks. For example, the Burj Khalifa used a strong subbase to hold its weight. My projects are smaller, but the idea is the same.
I spread the gravel evenly and compact it well. Compacting stops the subbase from shifting after pouring. A solid subbase spreads the weight evenly and prevents damage.
Setting Up the Forms
Finally, I build forms to shape the concrete. Forms are molds made of wood or metal that hold the concrete in place. They must be straight and sturdy, especially for driveways where precision is key.
I secure the forms tightly and check they are level. Uneven forms can ruin the slab’s look and strength. In tall buildings, forms are designed to handle heavy loads. My forms don’t face such stress, but I still anchor them well. This keeps the concrete in place and helps it set properly.
“Good preparation leads to strong foundations.” This idea works for patios and skyscrapers alike.
By following these steps, I make sure the site is ready. Proper preparation saves time and ensures a strong, lasting result.
Tools and Materials for Concrete Pouring
Using the right tools and materials makes concrete work easier. I gather everything before starting to avoid delays or errors.
Important Tools
I depend on a few main tools for concrete projects. These tools help me work faster and get good results.
- Shovels, wheelbarrows, and concrete mixers: Shovels move the concrete mix, and wheelbarrows carry it around. A concrete mixer blends the mix evenly, which is important for strength. Hand mixing is fine for small jobs, but mixers save time for big ones.
- Screeds, floats, and trowels: After pouring, I use a screed to level the surface. This step removes extra concrete and makes it flat. Floats smooth the surface more, and trowels give it a neat finish. These tools are key for strong, good-looking concrete.
Materials
The materials I pick affect how long the concrete lasts. Good materials make a strong foundation.
- Concrete mix, water, and reinforcement materials: I choose a mix that fits the project. Some mixes handle heavy loads, while others are for decoration. I add water carefully to keep the mix strong. Reinforcements like rebar or wire mesh stop cracks, especially in big slabs.
- Sealants and curing compounds: After pouring, I use a sealant to protect the surface from damage. Curing compounds keep moisture in, helping the concrete get stronger. These materials make the slab last longer.
“Preparation is the foundation of success.” This idea works for tools, materials, and every step.
By choosing the right tools and materials, I ensure strong, lasting concrete. Careful planning and focus lead to results I trust.
How to Mix and Pour Concrete
Pouring concrete starts with careful mixing. A good mix makes it strong and long-lasting. I always focus on the process to avoid mistakes.
Mixing the Concrete
Get the water-to-cement ratio right.
The water-to-cement ratio is very important. Too much water makes weak concrete. Too little water causes cracks or uneven surfaces. I follow the package instructions closely. If unsure, I ask an expert. Once, I added extra water to make mixing easier. The slab turned out brittle. Now, I measure water carefully for the right texture.
The mix should not be too dry or too wet. It should look like thick oatmeal. This texture helps the concrete set well and stay strong.
Mix by hand or use a concrete mixer.
For small jobs, I mix by hand. I use a shovel and wheelbarrow. First, I mix the dry parts. Then, I slowly add water while stirring. This works for small repairs or slabs.
For bigger jobs, I use a concrete mixer. The mixer blends everything evenly. This saves time and effort. Uneven mixing can cause weak spots. I always check the mix before pouring. A mixer also lowers the chance of mistakes on large projects.
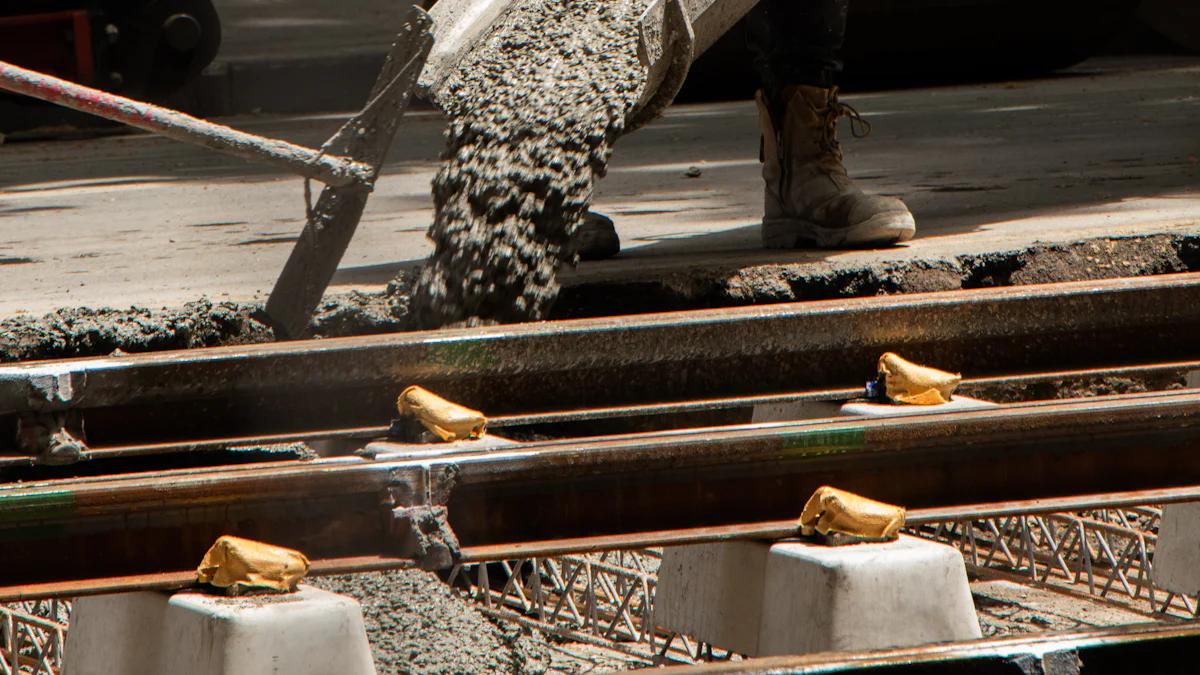
Pouring Techniques
Pour in layers to remove air pockets.
I pour concrete in layers, not all at once. Pouring too fast traps air, which weakens the slab. I spread each layer evenly. Then, I use a concrete hoe to remove air bubbles. This tool helps the concrete fill every corner.
For example, I poured a driveway in sections. I poured one layer, smoothed it, then added another. This made a solid, even surface without gaps.
Add reinforcements for extra strength.
Reinforcements like rebar or wire mesh make concrete stronger. I place them inside the forms before pouring. They spread weight evenly and stop cracks. For heavy projects, I use thicker rebar.
Once, I skipped reinforcements for a garden path. It cracked over time. Now, I always use reinforcements, even for small jobs. This simple step makes concrete last longer.
“Pouring concrete takes care and attention. Doing it right saves money and improves results.”
By following these steps, I mix and pour concrete properly. Each step, from mixing to layering, helps create a strong foundation.
How to Level and Finish a Concrete Slab
Making a concrete slab smooth and even is very important. This step helps the slab last longer and look good. I always work carefully to avoid cracks or uneven spots. Here’s how I do it.
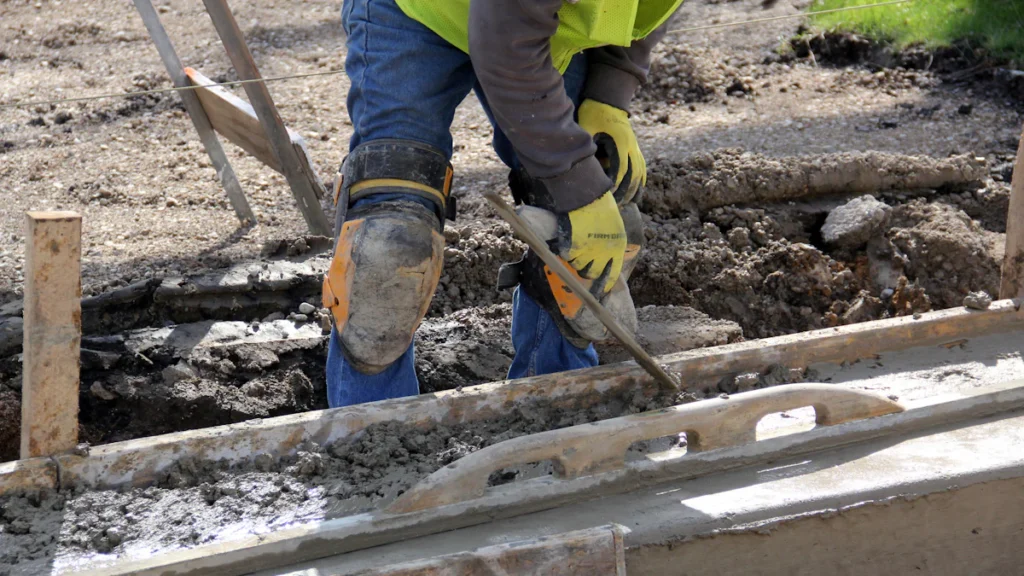
Screeding the Surface
Use a screed to spread the concrete evenly.
After pouring the concrete, I start leveling it right away. I use a screed board to spread the concrete across the surface. I hold the screed tightly and move it back and forth. This motion pushes extra concrete aside and fills low areas. For big jobs, like driveways, I use a longer screed to save time.
Remove extra concrete for a flat surface.
After leveling, I get rid of any extra concrete. Extra material can make the surface bumpy or uneven. I scrape off the extra and check that the slab looks flat. This step makes the next finishing steps easier. A well-leveled slab is key to a smooth finish.
Floating and Troweling
Use a float to smooth out small flaws.
Once the surface is leveled, I use a float to fix small imperfections. A float helps bring up fine particles and smooth the surface. I move the float in circles to create an even texture. For small slabs, I use a hand float. For larger areas, I use a bull float to cover more ground quickly.
Trowel for a polished and strong finish.
After floating, I use a trowel to finish the surface. A trowel makes the slab smooth and strong. I press it firmly and move it in overlapping arcs. This creates a dense, polished surface that lasts a long time. When I made my patio slab, troweling gave it a professional look.
Creating Control Joints
Cut joints to stop cracks from forming.
To stop cracks, I cut control joints into the slab. These cuts let the concrete expand and shrink without breaking. I use a groover or saw to make straight cuts. The depth of the cuts depends on the slab’s thickness. For walkways, I cut joints about one-fourth of the slab’s depth.
Space the joints evenly for strength.
Spacing the joints correctly is also important. I measure the slab and divide it into square sections. Proper spacing helps the slab handle stress without cracking. For driveways, I space the joints farther apart than for smaller slabs like garden paths. This careful planning keeps the slab strong over time.
“Finishing concrete takes skill and care. Each step matters for a strong, smooth result.”
By following these steps, I make sure every slab is even, smooth, and durable. Whether it’s for a patio or driveway, good finishing makes a big difference.
Curing and Taking Care of a Concrete Slab
Curing and caring for concrete keeps it strong for years. I always spend time on these steps after pouring. Curing makes the concrete reach its best strength. Maintenance keeps it in good shape for a long time.
Curing the Concrete
Keep the surface wet for at least a week.
After pouring, I start curing the concrete right away. Curing is different from drying. Drying removes water, but curing keeps moisture in. This helps the concrete harden evenly and prevents cracks. I keep the surface wet for seven days. For small jobs, I sprinkle water during the day. For big slabs, I use a hose with a mist nozzle to avoid soaking it.
Cover the slab to hold in moisture.
To keep the slab moist, I cover it with plastic sheets or curing blankets. These coverings trap water and stop the surface from drying too fast. Plastic works for most jobs, but blankets are better in cold weather. They keep the slab warm and help it cure faster. Once, I skipped this step, and cracks appeared. Now, I always cover the concrete properly.
“Curing makes concrete strong,” experts say. This step helps the slab handle stress and last longer.
Sealing the Surface
Use a sealer to protect the concrete.
After curing, I apply a concrete sealer. Sealers guard the surface from water, stains, and wear. They also make the slab look polished and clean. For outdoor slabs, I use a water-repellent sealer to block rain or snow. For indoor slabs, I pick a glossy sealer for a shiny finish.
Reapply sealer every few years.
Sealers wear off over time from weather or use. I reapply the sealer every few years to keep the slab protected. This step stops problems like stains or surface damage. For example, I resealed my driveway last year, and it still looks great.
Long-Term Maintenance
Clean the slab often to avoid damage.
Cleaning the slab regularly keeps it in good condition. Dirt and stains can weaken the surface. I sweep weekly and wash it with soap and water monthly. For tough stains, I use a cleaner made for concrete. A clean surface stays strong and looks nice.
Check for cracks and fix them quickly.
Even well-cured slabs can crack. I check the surface often for small cracks. I fill them right away with patching material to stop them from growing. Ignoring cracks can lead to bigger problems, like water damage. Fixing cracks early saves time and money later.
“Taking care of concrete makes it last.” This rule works for slabs and other projects.
By curing, sealing, and maintaining the slab, I make sure it stays strong. These simple steps help the concrete last a long time. Whether I use pre-mix or custom concrete, I always follow these practices for the best results.
Pouring concrete needs focus on each step. First, I prepare the site well to make a strong base. Mixing and pouring carefully avoids weak areas and keeps it strong. Finishing steps, like leveling and smoothing, make the surface even. Curing and caring for the slab help it last many years. By doing these steps, I build solid and dependable foundations. Taking time and staying safe are key to good concrete work.